For the longest time, I would have insisted that I despised eggplant.
Oddly enough, this wasn’t due to any adverse experience on my part. My family never ate eggplant growing up, and due to the aforementioned belief on my part, I never actually tried eggplant until just a few years ago. However, I once, long before I ever met Son, dated a guy who would eat just about anything… except for eggplant. Thusly, I was convinced it was a disgusting, vile vegetable that no person in their right mind would consume by choice.
Oh, what a poor, naive, misguided girl I was.
As with any vegetable (or food, really), it’s all in the preparation. And, to my good fortune, the first time I actually ever was presented with an opportunity to try eggplant, it was at a local Japanese restaurant – and it was fantastic.
(Also highly recommended, Chinese braised eggplant. This shall be my next eggplant project.)
Ever since then, I’ve wanted to replicate it at home. But I always get a little nervous when venturing into new recipes, with new ingredients I have no experience with. So… I procrastinated. For… er… almost exactly three years.
Quite often, a little push from an external source is the best way to get me to stop procrastinating on something. Such was the case here. As mentioned before, the newest addition to our family gatherings is my brother’s girlfriend, who is vegan – which has been an excellent excuse to expand my repertoire of delicious vegan dishes!
However, please promise me that you won’t procrastinate on making this for as long as I did! Because my goodness, this dish is so easy to make, and so delicious, it’s just plain embarrassing to admit that I was intimidated by it for so long. From start to finish it took less than half an hour to prepare, and it was such a success that there’s no doubt I’ll be cooking it again very soon.
Recipe slightly adapted from Daisy’s World.
Ingredients
- 2 tbsp mirin
- 2 tbsp sake
- 1/4 cup shiro miso
- 1 tbsp sugar
- 1 tsp sesame oil
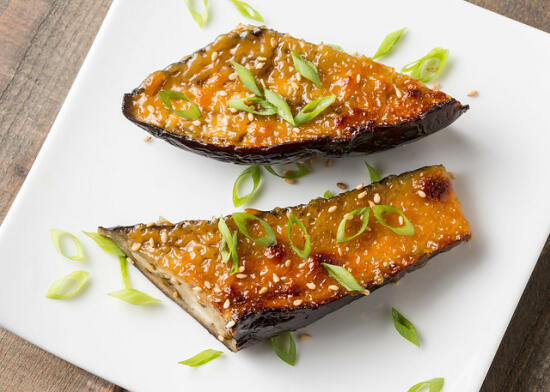
- 4 Japanese eggplants, stemmed and split in half lengthwise
- vegetable oil, as needed to coat eggplant
- 2 tsp toasted sesame seeds
- green onions, sliced
Cooking Directions
- Preheat broiler to high heat.
- Combine mirin, sake, miso, sugar, and sesame oil in a small bowl and mix until well-combined. Taste to adjust seasoning. Set aside.
- Score eggplant slices in a cross-hatch pattern. If desired, cut each eggplant slice into two or three smaller pieces, for easier serving. Brush each piece with vegetable oil until lightly coated all-over. Broil eggplant, cut-side down, for about 5 minutes. Turn over and continue to cook until almost tender, about 3ŌĆō4 minutes.
- Remove from heat and brush the miso glaze on the cut surface of the eggplant, then place on a broiler pan, cut-side up. Broil until completely cooked and the glaze has caramelized. This could take anywhere from 3-10 minutes (mine took closer to 10 minutes), so keep an eye on it so it browns nicely but doesn’t burn.
- Garnish with sesame seeds and green onions.
- Enjoy!
Happy St. Patrick’s Day!
I know you might be wondering… who abducted Allison and replaced her with someone who posts regular, timely blog posts?!?!
Well, if it makes you feel any better, I made this recipe, oh… about a year and a half ago. And it’s been sitting in my “to blog” backlog ever since then.
It may not have even occurred to me to blog about it this week, except that my family has randomly decided to celebrate St. Patrick’s Day (for possibly the first time ever). I’ve been tasked with bringing a side dish that our vegan guest can eat, so I’m making this (without the bacon and butter, of course)!
If you’re not vegan, this dish is also fantastic with the addition of bacon and butter. ¤śĆ
Recipe from Tastespotting.
Ingredients
- 3 lbs sweet potatoes, scrubbed, chopped into large chunks
- 1/2 cup olive oil
- salt and pepper
- 1 large bunch of kale, ribs removed, sliced into thin ribbons
- butter, for serving (optional)
- bacon, cooked, crumbled (optional)
Cooking Directions
- Put sweet potatoes in large pot, and fill with enough cold water to cover them by about 2 inches. Bring to a boil, reduce heat, and simmer until sweet potatoes are tender, about 15 minutes.
- Reserve about 1/2 cup of cooking water, then drain the sweet potatoes. Remove skins.
- In another pot, boil the sliced kale until tender, about 10 minutes. Drain and reserve.
- Mash the sweet potatoes with olive oil, adding cooking water to get the desired consistency. Season the potatoes with salt and pepper, to taste.
- Stir in cooked kale.
- For non-vegan guests, you can stir in butter, and/or top with cooked, crumbled bacon.
- Enjoy!
Happy Pi(e) Day!!!
Math has always been my favorite subject (I’m the kind of nerd who gets excited when I have an excuse to do math), and I adore pie. So it’s no surprise that Pi(e) Day is my absolute favorite random holiday of the year!
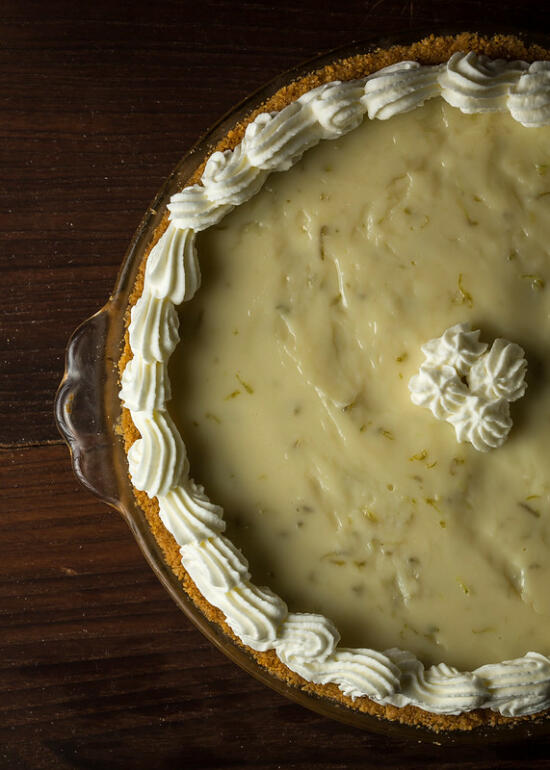
This key lime pie is easy to make, delicious, and also totally color-appropriate for St. Patrick’s Day this week.
And even if you think these food holidays are ridiculous… when is it ever not a good day for pie? ¤śĆ
Recipe from The Daring Gourmet.
Ingredients
- 1 1/2 cups graham cracker crumbs
- 1/3 cup sugar
- 6 tbsp butter
- 2 (14 oz) cans sweetened condensed milk
- 3/4 cup fresh key lime juice
- 1 tablespoon key lime zest
- 1/2 cup plus 2 tablespoons sour cream
Cooking Directions
- Preheat the oven to 375°F.
- To make the crust, place the graham cracker crumbs, sugar and butter in a bowl and stir until thoroughly combined. Press mixture into a 9-inch pie plate and bake for 7 minutes. Let the crust cool completely before adding the pie filling.
- Preheat the oven to 350°F.
- In a large non-metal bowl, combine the sweetened condensed milk, lime juice and zest, and the sour cream. Stir until thoroughly combined.
- Pour the mixture into the graham cracker crust and bake for about 10 minutes. Make sure to not brown it.
- Let the pie cool completely, then transfer it to the fridge to chill for at least two hours before serving.
- Enjoy!
“We’re making pot roast and artichokes tonight if you wanna come over.”
I had planned on stopping by my dad’s house that evening anyways to check in on him, so when my sister texted me, my answer was an obvious yes.
“Shall I bring anything?”
“If there’s a vegan side dish you want to bring, that would be cool cause I think Vivian [our brother’s girlfriend] is gonna be there and she’s vegan.”
I’m always up for a food challenge, so I dug through my bookmarked recipes, looking for something tasty. It needed to be something easy, too, as I only had a few hours to run to the store and cook something before I was supposed to be at my dad’s.
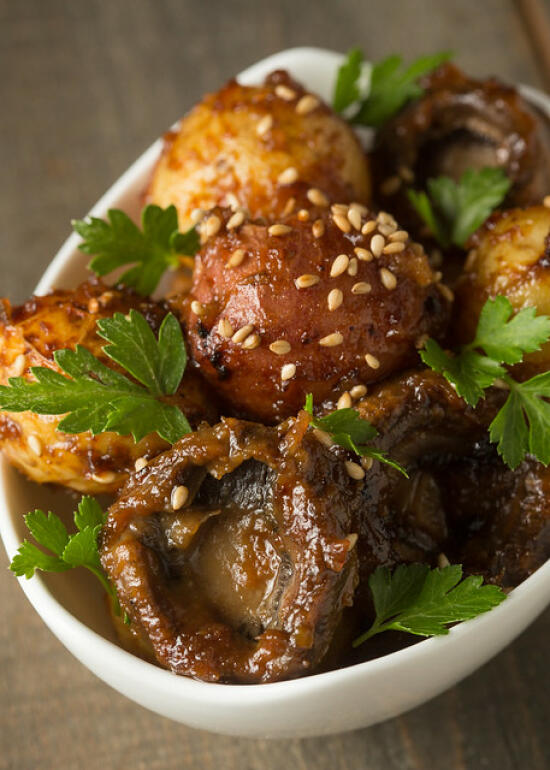
This Miso-Roasted Potatoes and Mushrooms recipe from A Thought For Food fit the bill perfectly. Vegan, easy to make, sounded tasty, and (hopefully) filling enough to act as a main for Vivian.
Within a few hours, my kitchen smelled delicious.
We may have snuck more than a few bites before we left for dinner.
Dinner was a rousing success! Everyone loved the miso potatoes and mushrooms. The pot roast, brussels sprouts, and artichokes my sister and her girlfriend made were delicious.
I’ve already invited myself over to do it again next Sunday. ¤śĆ
Recipe slightly adapted from A Thought For Food.
Ingredients
- 1 lb fingerling potatoes
- 1 lb white mushrooms
- 1 garlic clove, minced
- 2 tsps minced ginger
- 3 tbsp white miso
- 2 tbsp brown sugar
- 2 tbsp sesame oil
- 2 tsp chopped parsley (optional)
- 4 stalks green onions, chopped (optional)
- 1 tsp sesame seeds
Cooking Directions
- Preheat oven to 400°F. Line a rimmed baking sheet with parchment paper.
- In a large mixing bowl, whisk together the miso, brown sugar, sesame oil, garlic, and ginger. Add the potatoes and mushrooms to the bowl, and toss to coat.
- Transfer potatoes and mushrooms to the lined baking sheet. Place in oven and cook for 30-45 minutes, or until you can easily pierce the potatoes with a fork, stirring halfway through.
- Transfer roasted potatoes and mushrooms to a serving bowl. Sprinkle fresh parsley, green onions, and sesame seeds on top.
When you’re just having one of those days (months… years?), when the stress is piling up and life has got you down, nothing beats the combination of peanut butter and chocolate.
Historically, the easiest way to get me out of a funk is with a pint of chocolate peanut butter ice cream (with a nice, thick peanut butter swirl, of course!)
But these brownies? Oh yes, they’ll do. They very much do the trick.
Richly chocolatey, with a thick, creamy peanut butter layer. I’ll bring the brownies, and we can commiserate together.
Recipe from Becca of Cookie Jar Treats, found on Fridgg.
Ingredients
- 1 cup natural peanut butter
- 1/3 cup honey
- 1/4 cup coconut oil
- 3/4 cup natural unsweetened cocoa powder
- 3/4 cup unbleached all-purpose flour
- 1/4 tsp salt
- 1/2 cup canola oil
- 1 cup sugar
- 3 large eggs, room temperature
- 2 tsp vanilla extract
Cooking Directions
- Preheat the oven to 350°F. Line an 8×8 inch baking pan with aluminum foil. Grease foil with cooking spray.
- In a large bowl, mix together the peanut butter, honey, and coconut oil. Cover the bowl with plastic wrap and chill in the refrigerator while you make the brownie batter.
- Sift together the cocoa powder, flour, and salt into a medium bowl. Whisk to combine. In a large bowl, whisk together the canola oil and sugar until smooth. Beat in the eggs one at a time. Stir in the vanilla. Add the dry ingredients into the wet ingredients and fold to combine.
- Spread half of the brownie batter into the prepared pan. Pour the peanut butter filling over the brownie batter, and spread the peanut butter filling towards the edges.Cover the filling with the remaining brownie batter.
- Place pan on the center rack and bake for 20-25 minutes or until a tooth pick comes out mostly clean with the exception of a few moist crumbs and a bit of peanut butter filling. Allow the brownies to cool in the pan for at least half an hour before removing to a cooling rack to cool completely. Once cool, slice and serve.
- Enjoy!