Archive for the ‘recipes’ Category
These days, my dinner prep sounds something like this:
What can I make that’s super easy, takes as little time as possible, uses up whatever random ingredients I have laying around, and is hopefully a bit healthy?
Also, I would like to please not turn on the oven, because it’s summer and already quite warm to begin with.
Most days that either ends up being a sandwich, rice + some protein from the freezer + whatever veggies we have… or cereal.
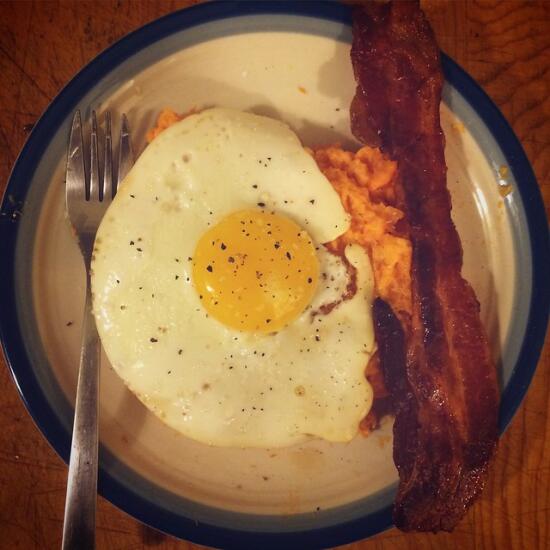
Which brings me to last night’s dinner. So easy and satisfying, I just had to tell you about it, crappy iPhone photo and lack of a proper recipe be damned.
Just a few ingredients, super easy to make, and although the bacon takes a while to bake, it still counts as quick because I didn’t have to babysit it the entire time. Also, because bacon. Worth it.
~~~~~~~~~~
Bacon. Preheat the oven (or, in my case, toaster oven) to 400°F. Line a baking sheet with a couple of layers of aluminum foil, to make clean-up easy. Lay out the bacon strips so they’re not overlapping, cover loosely with another piece of foil (optional, but it helps prevent splatters), and bake for 30-40 min, flipping the bacon after 20 minutes. Check it at the 10- and 30-minute marks, to make sure it doesn’t burn. (It took me 40 minutes, but I was using a toaster oven, with convection heating, and had it covered in foil, so YMMV.)
Sweet potatoes. Wash, prick with a fork, microwave on high for 5-10 minutes. Let cool a bit, then scoop out flesh into a bowl and mash with a glug of heavy cream (that you just happened to have in your fridge because your mom had it leftover from making ice cream. the usual.). You could also mash it with butter or olive oil, either would work just as well.
Egg. Fry it in sesame oil (or butter or bacon fat or olive oil or…), over medium heat.
Put it all together, season with a sprinkle of salt and pepper, (add your preferred hot sauce, if you’re like Son), and enjoy!
~~~~~~~~~~
Easy-peasy. And delicious!
Happy Independence Day!
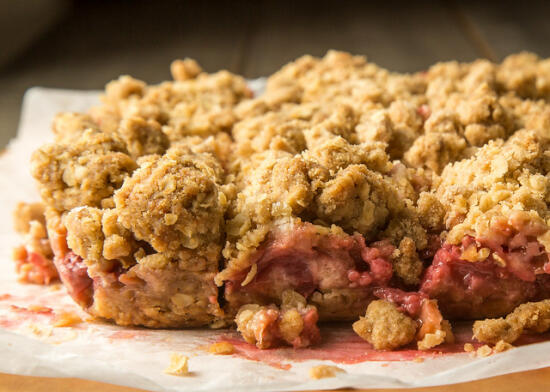
Ever since making these strawberry rhubarb crumble bars, they’ve become a family favorite and I’ve found they’re very adaptable.
Since we have a vegan family member these days, I’ve also tried making these with coconut oil instead of the butter so she could have some too.
Best. decision. ever.
Son and I actually ended up liking the coconut oil version even better! Both versions are delicious, and it’s a super easy substitution to make.
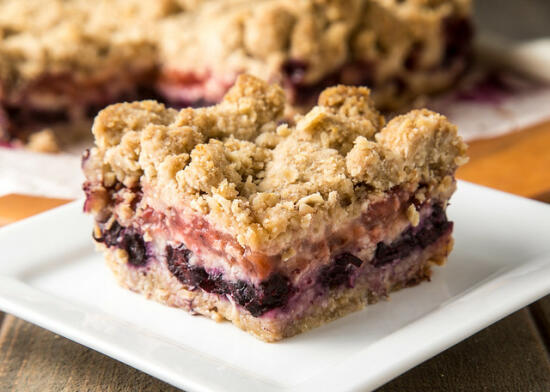
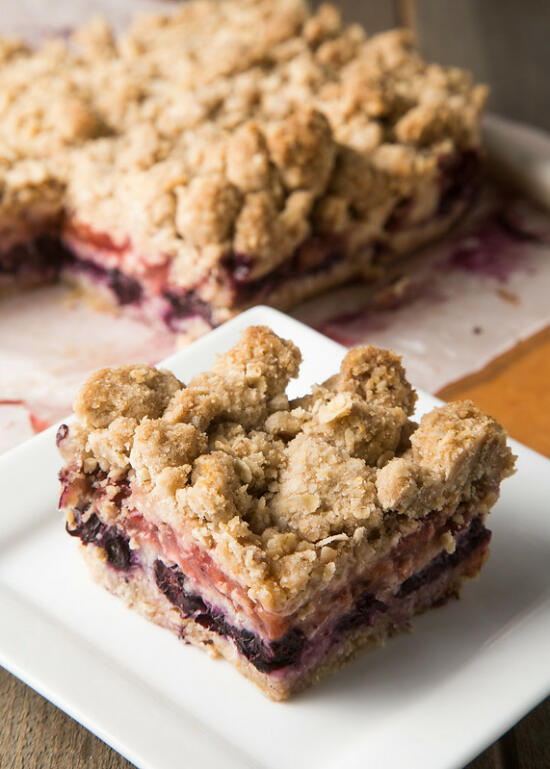
Since these bars are so easy to make, it was a simple decision to make them for our 4th of July celebration! Instead of rhubarb, I used frozen blueberries and strawberries for a red, white, and blue theme.
They’re so easy to make, and so delicious, that if you’re like me and always have frozen fruit on hand, then you have absolutely no excuse not to make them!
Vegan Blueberry Strawberry Crumble Bars, adapted from Smitten Kitchen.
Ingredients
- 2 cups (160g) rolled oats
- 1.5 cups (190g) all-purpose flour
- 1 cup (190g) light brown sugar
- 1/2 tsp table salt
- 12 tbsp coconut oil, melted (or butter, if not vegan)
- 1.5 tsp cornstarch
- 1.5 tbsp lemon juice
- 1.5 tbsp granulated sugar
- 1.5 cups frozen blueberries, thawed and drained
- 1.5 cups frozen strawberries, thawed and drained
Cooking Directions
- Heat oven to 375°F. Line an 8×8″ square baking pan with parchment paper, so they’ll be easy to remove.
- Mix oats, flour, brown sugar, and salt in a large bowl. Add melted butter, and stir until medium-sized clumps form. (Mine ranged from pea-sized to grape-sized, and that worked wonderfully.) Press half of the crumble mixture evenly into the bottom of the pan.
- Spread the blueberries evenly over the crust. Sprinkle with half of the the cornstarch, lemon juice, and granulated sugar.
- Spread a thin layer of the oat mixture over the blueberries.
- Spread the strawberries evenly over the crust. Sprinkle with the remaining half of the the cornstarch, lemon juice, and granulated sugar.
- Spread the remaining crumble evenly over the fruit, and bake bars for 30-40 minutes, until the fruit is bubbly and the crumble is golden and smells delicious.
- Let cool in pan; Deb recommends doing this in the fridge, so they’ll become crisp once chilled, and that worked out great for me. Cut into squares to serve. Store leftovers in fridge.
- Enjoy!
Rhubarb.
Food bloggers FLIP OUT about rhubarb season every year, but I never really understood why.
Tart red celery, in desserts… er… yum?
I tried rhubarb for the first time on our Europe trip last year… and absolutely hated it. -_-
At that point, I figured rhubarb to be one of those things that you’re *supposed* to be totally into, but is really kind of gross.
Like kale.
(Heh. Please don’t kick me out of California for that. ;))
Then we got to go to Gjelina with a client, and they decided to order the warm strawberry and rhubarb crisp with almond gelato. I was not even a little bit expecting to like it, and got my MIND. BLOWN.
Rhubarb! I totally get it now. ¤śĆ
So now that I’m a new rhubarb convert, I decided this was the year to try actually cooking with it.
~~~~~~~~~~
Since coming back from our Europe trip last year, I’ve been trying to reproduce all of the tasty things we ate on that trip. (This is also why it’s taken me so long to get around to blogging about the trip.)
I imagine the rhubarb dish we had shouldn’t have been *that* awful… so I ordered a little bit of rhubarb in one of my weekly Farm Fresh to You CSA boxes, with the intent of attempting a better version of it.
Turns out, I waaaaaaay mis-estimated the amount of rhubarb I should order… and ended up with a refrigerator chock full of rhubarb stalks.
Oops.
However, in a wonderful coincidence, I also had about a quarter-flat of strawberries in the fridge that desperately needed to be used up.
Strawberries and rhubarb! Classic combination, right?
I thought about trying to reproduce the Gjelina crisp, but then realized I wanted something that would be easier to share.
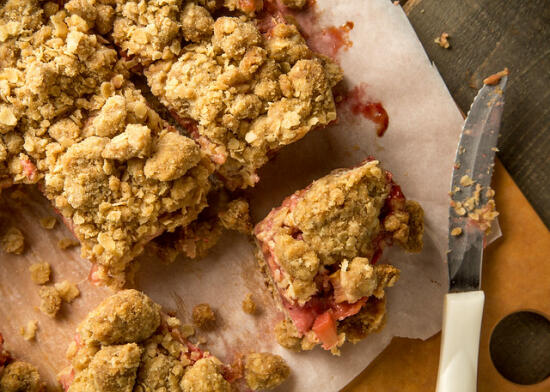
These strawberry rhubarb crisp bars from Smitten Kitchen fit the bill perfectly.
I made a few changes, mostly because I wanted to use up all the leftover strawberries and rhubarb I had (so I upped the amount of filling, and doubled the recipe), and I am very pro-crumble (moar crumble!!!).
But these bars have put the strawberry-rhubarb flavor combination solidly in my list of favorites. Sweet strawberries mix with tart rhubarb to keep these from being so sweet your teeth hurt, and all the crumble (ALL the crumble!) adds a nice crunchy heartiness to it.
Plus, it’s fruit and oatmeal… so totally healthy, right? ¤śē
Strawberry Rhubarb Crumble bars, adapted from Smitten Kitchen.
Ingredients
- 2 cups (160g) rolled oats
- 1.5 cups (190g) all-purpose flour
- 1 cup (190g) light brown sugar
- 1/2 tsp table salt
- 12 tbsp (170g) unsalted butter, melted
- 1.5 tsp cornstarch
- 1.5 tbsp lemon juice
- 1.5 tbsp granulated sugar
- 1.5 cups (190g) diced rhubarb (about 2-3 stalks)
- 1.5 cups (230g) diced strawberries
Cooking Directions
- Heat oven to 375°F. Line an 8×8″ square baking pan with parchment paper, so they’ll be easy to remove.
- Mix oats, flour, brown sugar, and salt in a large bowl. Add melted butter, and stir until medium-sized clumps form. (Mine ranged from pea-sized to grape-sized, and that worked wonderfully.) Press half of the crumble mixture evenly into the bottom of the pan.
- Spread the fruit over the crust. Make sure both types of fruit are spread evenly, so every bite gets a bit of each. Sprinkle evenly with the cornstarch, lemon juice, and granulated sugar.
- Spread the remaining crumble evenly over the fruit, and bake bars for 30-40 minutes, until the fruit is bubbly and the crumble is golden and smells delicious.
- Let cool in pan; Deb recommends doing this in the fridge, so they’ll become crisp once chilled, and that worked out great for me. Cut into squares to serve. Store leftovers in fridge.
- Enjoy!
As you may have noticed, I’m blogging quite a bit more often these days.
(Pretty soon, you might even mistake me for *gasp*… a real blogger! But don’t let yourself be fooled. I don’t have nearly enough readers to be a “real” blogger. ¤śē )
This means I’m slowly making my way through a several-year-old backlog of recipes that I’ve made, photographed, and just never quite got around to blogging about.
(And heck, that means I might even get around to blogging about the trip to Europe that Son and I took a year ago! … eventually!)
This egg salad recipe, for example, was something I made almost four years ago.
(GEEZ!)
I have distinct memories of sitting on the edge of a counter during a break between ballet classes, eating the best egg salad sandwich I had ever made. It was wonderful.
(And before you ask, no I was not 12 years old four years ago, but I was still trying to be a ballerina when I grew up…)
So, yes. Egg salad. Four years later. With smoked salmon! Definitely a must-try, especially if you happen to have leftover Easter eggs that need to be used up.
(Or there’s always deviled eggs. Mmmm… deviled eggs.)
Recipe originally from Danny Ahern via The Washington Post.
Ingredients
- 8 hard-boiled eggs, chopped
- 1/2 cup plain yogurt (or mayonnaise)
- 1 tbsp chopped fresh dill
- 1 tbsp chopped fresh parsley
- 1/2 tsp kosher salt, or more to taste
- 1/4 tsp freshly ground black pepper, or more to taste
- 1/2 tsp garlic powder
- 1/2 tsp celery seed
- 3 oz smoked salmon, finely chopped
Cooking Directions
- Mix all ingredients together.
- Enjoy!
- Serving suggestions: with a fork, in a lettuce wrap, in a sandwich with your preferred bread and toppings.
I was the pickiest of children, growing up. There were only a few vegetables that I’d tolerate, and only under very specific circumstances:
- steamed broccoli liberally dipped in a mixture of mayonnaise and shoyu (which is far better than it sounds, and still my favorite way to eat steamed vegetables)
- corn on the cob with butter and salt (with those little yellow corn holders, of course)
- steamed artichokes, with plenty of butter to dip it in
- potatoes. In any form. Obviously.
I was not a fan of cauliflower, hated steamed carrots, and frozen peas were my arch nemesis. Don’t even get me started on all those weird, exotic vegetables like eggplant (heh), asparagus, or brussels sprouts. And tomatoes? Totally gross.
I’d like to say this all changed when I grew up and became a bit more mature in my tastes, but what really happened was that I discovered the joys of roasting.
Pretty much any vegetable will taste great if you toss them with a little salt and olive oil, roast them until they show their sweet side, and then stand in the kitchen eating them with your fingers straight from the hot baking sheet.
Not that I do that.
Nope, definitely not.
(Although if I did, I could tell you that that is when roasted vegetables are at their best – straight from the oven, when they’re nearly so hot they burn your fingers, and nice and crispy and caramelized.)
Should you roast asparagus? Do it.
Brussels sprouts? Totally.
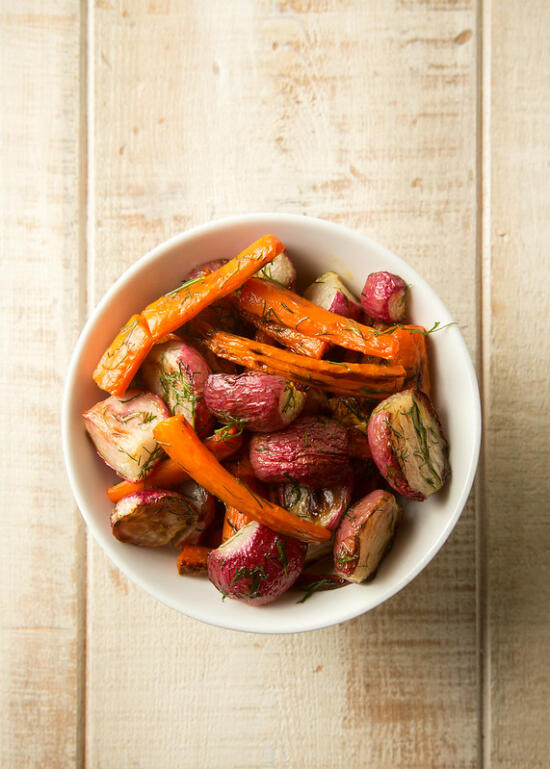
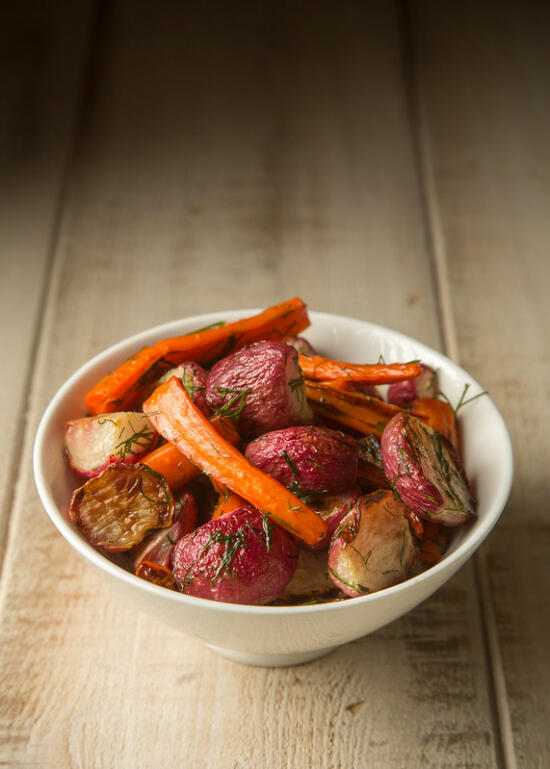
Carrots and radishes, and then toss them in a yummy dill butter? Obviously, do you even have to ask?!
Recipe originally from Sweet Peas and Saffron, although I can no longer find the recipe on her blog.
Ingredients
- 1 bunch of radishes, trimmed and sliced in half
- 1 bunch of carrots, trimmed and sliced in half lengthwise
- 1 tbsp olive oil
- 1 tbsp butter
- 1 tbsp minced fresh dill
- salt and pepper, to taste
Cooking Directions
- Preheat oven to 400°F. Toss prepared carrots and radishes in olive oil, then arrange on a rimmed baking sheet lined with parchment paper. Roast for 20 minutes, then toss and roast for an additional 20-30 minutes, or until vegetables are tender.
- Melt butter, then stir in minced dill. Toss the roasted carrots and radishes in butter, then season with salt and pepper to taste. Serve immediately.
- Enjoy!