Archive for the ‘recipes’ Category
Happy Valentine’s Day!
Whether you’re celebrating your sweetie, hanging out with your gal pals, or want to bring a treat into the office (because who doesn’t love cupcakes?), this week I’ve rounded up ten of our top last-minute Valentine’s Day treats from Fridgg.
For example, you could seduce your sweetie with these tasty oysters with chocolate and a saffron sauce!
These chocolate hazelnut truffles from Katherine of Gouda Monster are perfect for valentines or galentines!
This decadent dark chocolate and raspberry souffle from Serena of Foodful Life is sure to please!
This easy chocolate cherry banana bread from Joanne of Family Food Ideas is perfect to make for friends or family.
It wouldn’t be Valentine’s Day without something from Elizabeth of Sugar Hero! Her nutella pound cake petit fours are tasty and easy, especially if you use store-bought pound cake.
These nutella hearts from Stacie of Simply Stacie are totally sweet and super easy to make.
Another easy last-minute Valentine’s Day from Stacie of Simply Stacie – hugs and kisses rolls!
Take a shot at love with these fiery chocolate shots from MJ of MJ’s Kitchen.
These easy nutella cupcakes from Elizabeth of Sugar Hero! are so simple to make, they’re perfect if you need a last-minute Valentine’s Day treat!
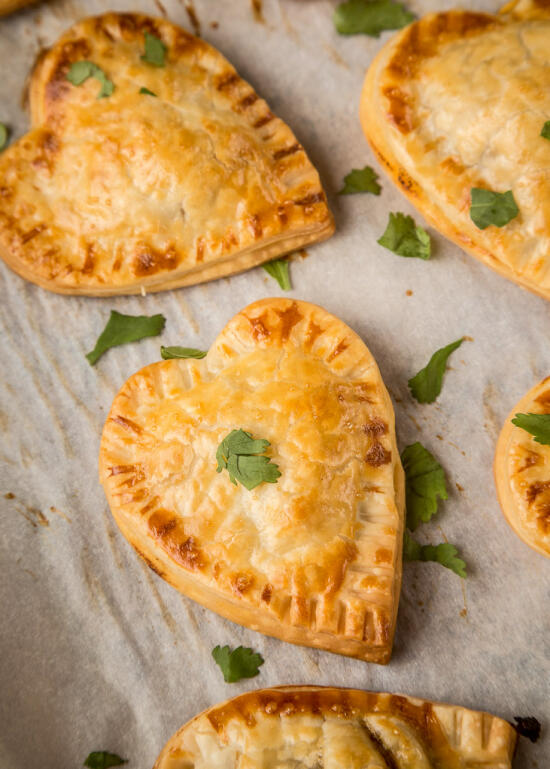
Our top last-minute Valentine’s Day treat also comes from Stacie – since they’re made with jarred butter chicken sauce, these butter chicken hand pies are a breeze to whip up for a cute Valentine’s Day dinner!
I love butter chicken, so I was excited to have an excuse to try out these fun butter chicken hand pies.
Despite a slight mishap on the butter chicken side of things, once the butter chicken was made I found these to be super easy to make, and quite tasty!
The original recipe used jarred butter chicken sauce, while I made my own butter chicken from scratch and used that as the filling instead. If you’re looking for a quick last-minute treat, the jarred version may work better, but I urge you to try out the butter chicken recipe if you have more time – it’s definitely worth the extra effort!
Butter Chicken Hand Pies
Slightly adapted from Simply Stacie.
Ingredients
- 1/4 batch of butter chicken (save the rest for another meal, or you can make multiple batches of hand pies)
- 1 tbsp fresh cilantro, chopped
- 1 package of refrigerated pie crust dough (enough for two pies)
- 1 egg yolk
- 1 tsp water
Cooking Directions
- Cook the butter chicken. When the chicken is finished, shred one of the pieces of chicken and mix it with a bit of sauce to moisten, then stir the cilantro into the shredded chicken.
- Preheat oven to 450°F. Line a baking sheet with parchment paper.
- Unroll both pie crusts and, using a heart shaped cookie cutter, cut out as many heart shapes as you can from the dough.
- Lay half of the hearts on the baking sheet. In the center of each heart, add about a teaspoon of butter chicken mixture. Place the remaining hearts on top to cover. Using a fork, press down the edges of each heart to seal.
- In a small bowl, whisk together the egg yolk and water. Using a pastry brush, brush the egg mixture on the tops of the hearts.
- Bake for 10 minutes, or until golden brown. Serve hot.
- Enjoy!
If you follow the Fridgg blog, you’ve probably noticed the top ten posts that I’ve started doing every week, to feature our Fridgg users and the recipes they’ve contributed.
It’s been a ton of fun cooking the recipe that comes in at the number one spot every week. I love the excuse to cook all sorts of things I may not have had a good enough reason to cook otherwise (ahem, like yesterday’s amazing raspberry chocolate mousse cake!), and it’s an awesome opportunity to highlight all the fantastic photos and recipes our users have uploaded over the last few years.
Next week’s top recipe is a fun Valentine’s Day treat, which happens to involve butter chicken. The original recipe calls for a jarred butter chicken sauce, which, in the spirit of ease as well as keeping true to the original recipe, I ordered from Amazon.
… and then I received a bubble-wrapped package of broken glass and sauce that smelled more like Spaghetti-Os than butter chicken. (Thank goodness for Amazon’s amazing refund policy!)
So in the spirit of trying out Fridgg’s top recipes, I figured, why not try making our most popular butter chicken recipe from scratch instead?
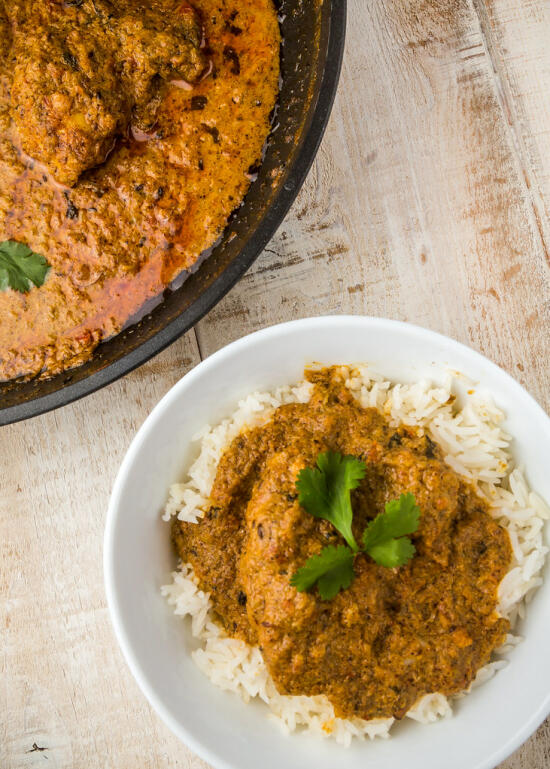
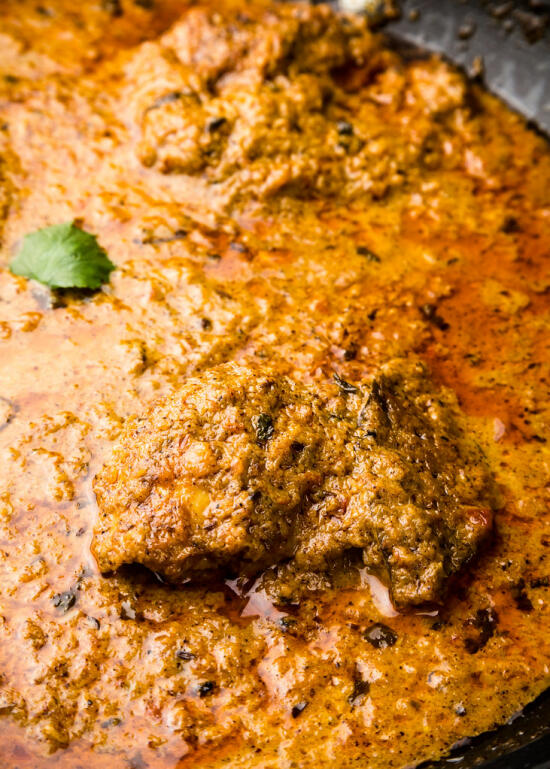
After a quick search, I found that our top butter chicken recipe is this one, from Pepper Garlic Kitchen. Looks tasty, and as authentic as can be!
Don’t let the long list of ingredients scare you. Most of them are fairly common or can be easily bought online, and the recipe itself is easy enough to make.
And it’s ever so delicious – much better than instant sauce that tastes like Spaghetti-Os, I’m sure.
Plus, Wednesday’s recipe won’t use the entire batch of butter chicken – so you get two meals in one!
Butter Chicken
Recipe from Pepper Garlic Kitchen.
Ingredients
To marinate chicken:
- 1 lb chicken
- 1/4 cup yogurt
- 1/4 tbsp ground ginger
- 1/4 tbsp garlic powder
- 1 tbsp paprika
- 1 tsp garam masala powder
Sauce:
- 1 tbsp vegetable oil
- 1/4 cup butter, divided
- 1 tsp cumin seeds
- 1 dried bay leaf
- 1 inch cinnamon stick
- 1 medium onion
- 1/2 inch ginger
- 5-6 garlic cloves
- 2 green chiles
- 1 tsp whole black peppercorns
- 1 medium tomato
- 1/2 tsp ground turmeric
- 1 tsp ground coriander
- 1 tsp red chili powder
- 1 tsp garam masala powder
- 1 1/2 tsp dried fenugreek/methi leaves
- 1/2 cup heavy cream, divided
- salt to taste
- cilantro for garnish
Cooking Directions
- In a large bowl or ziploc bag, mix the yogurt, ground ginger, garlic powder, paprika, and 1 tsp garam masala powder with the chicken.
- Marinate the chicken in the refrigerator for at least 30 minutes.
- In the meantime, heat the vegetable oil in a heavy bottom pan over medium-low heat. When oil is hot, melt half of the butter into it.
- Add cumin seeds, bay leaf, and cinnamon stick to the oil.
- Coarsly cut up the onion, then puree in a food processor until it forms a paste.
- When seeds start to splutter, add the onion paste and cook until golden.
- Puree the ginger, garlic, green chiles, and peppercorns in the food processor.
- Add the ginger paste to the pan. Let it cook for a couple of minutes.
- Puree the tomato in the food processor.
- When mixture in the pan starts bubbling, add the pureed tomato.
- In a bowl, mix the ground turmeric, ground coriander, red chili powder, and remaining garam masala powder. Add just enough water to make a paste. Transfer it to the pan, and cook while stirring occasionally.
- When the mixture starts to release oil, add the marinated chicken. Stir it well so that all chicken is coated with the sauce.
- Add 1/4 cup of the cream, the fenugreek leaves, and salt. Let it simmer for around 10-15 minutes. Stir occasionally to keep the chicken from sticking to the pan.
- Cover with a lid and let cook until the chicken is cooked thorugh. Add the remaining cream and butter.
- Stir well, so everything is combined.
- Garnish with garam masala, fenugreek leaves, and/or cilantro leaves. Serve with naan or rice.
- Enjoy!
It’s just a week until Valentine’s Day! What are your plans?
If you’re anything like me, you might be working, going to the gym… and not doing a single romantic thing that day.
But! The best part of Valentine’s Day, whether you’re in a relationship or not, is that it’s the perfect excuse to make something decadent and delicious – even if you’re keeping it all to yourself!
So this week, I’ve got our top ten most amazing Valentine’s Day sweets. Make one, make ’em all, have a sweet day!
These pretty pink Valentiene’s cookies from Claire of The Simple Sweet Life will bring out the artist in you!
Love doughnuts but hate frying? Justine’s chocolate-glazed baked doughnuts, from her blog Cooking and Beer, are the perfect easy alternative!
These gorgeous chocolate rose cupcakes from Elizabeth of Sugar Hero!, are ever so romantic!
Stacie of Simply Stacie keeps it simple with store-bought cupcake toppers for her Valentine’s Day cupcakes.
If it’s decadence you’re looking for, Liz’s ‘La Vie en Rose’ chocolate cherry cake from her blog The Red Bistro fits the bill perfectly.
These cute Valentine’s Day mini cakes, that Elizabeth of Sugar Hero! made for the Oh! Nuts blog use store-bought wafers, so they’re super easy to put together!
These chocolate-covered strawberry hearts from Jen of Pink When are a fun take on a Valentine’s Day classic!
This gorgeous romantic Valentine’s Day cake from Giustina of Domestically Blissful is a beautiful edible take on the traditional heart-shaped box of chocolates.
Laurie’s chocolate champagne cupcakes, from her blog Frosting and a Smile, are perfect for any celebration!
And our number one most popular, most amazing, and most decadent Valentine’s Day sweet on Fridgg… is this chocolate raspberry mousse cake, also from Elizabeth of Sugar Hero!
I have never been so excited to have an excuse to make a recipe from Fridgg. I’ve drooled over her photos of this cake for years, but never thought I’d actually make it.
It’s even more perfect, because my mom is a huge (huge!) fan of anything chocolate-raspberry. So… guess who got most of the leftovers of this cake? 😉
Now, I know this recipe looks intimidating. Lots of ingredients, and a long, long list of directions.
But don’t be fooled! I actually found this recipe to be surprisingly easy to make. Most of the cook/prep time is actually just waiting for things to cool or chill, so you have plenty of time in-between layers to do whatever you please. And all three of the mousse layers are pretty similar, so once you’ve mastered one, the other two are a breeze.
And OH MY GOOD GOSH this cake is so amazingly delicious. You’d think it would be really rich and super heavy, and while yes it is a surprisingly heavy cake when you try to carry it around, when you eat it every bite is like eating a cloud. It’s sweet from the chocolate layers and tart from the raspberries, with a moist brownie base and a decadent ganache topping. Perfect for a Valentine’s Day party!
Chocolate Raspberry Mousse Cake
Recipe from Sugar Hero!.
Ingredients
Brownie cake:
- 4 oz (1 stick) unsalted butter
- 7 3/4 oz (1 cup + 2 tbsp) granulated sugar
- 2 large eggs, at room temperature
- 2 tsp vanilla extract
- 3 1/3 oz (3/4 cup) all-purpose flour
- 2 oz (2/3 cup) unsweetened cocoa powder
- 1/2 tsp salt
- 1/2 tsp baking powder
Chocolate mousse:
- 9 oz semi-sweet chocolate, finely chopped
- 1 3/4 cups heavy cream, divided
- a pinch of salt
- 2 tsp unflavored powdered gelatin (about 1 envelope)
- 2 tbsp water
Raspberry mousse:
Honey-vanilla mousse:
- 9 oz white chocolate, finely chopped
- 1 1/2 cups heavy cream, divided
- 4 tbsp honey
- a pinch of salt
- 2 tsp unflavored powdered gelatin (about 1 envelope)
- 2 tbsp water
- 2 tsp vanilla bean paste (can substitute vanilla extract)
Ganache/decorations:
- 4 oz semi-sweet chocolate, finely chopped
- 4 oz heavy cream
- 1 pint fresh raspberries
- chocolate curls or other decorations
Cooking Directions
Brownie cake:
- Preheat oven to 350°F. Line a 9-inch cake pan with parchment and spray with nonstick cooking spray.
- Cube the butter and place it in a medium saucepan over medium-low heat. Stir occasionally as the butter melts. Add the sugar, and stir until well mixed-in. The mixture will be grainy. Do not allow the mixture to come to a boil.
- Remove the pan from the heat, and let it cool to lukewarm. Once it has cooled, add the eggs, one at a time, whisking well after each addition. As you add the eggs, the grainy sugar/butter mixture will become shiny and smooth. Whisk in the vanilla.
- Stir in the remaining brownie ingredients.
- Scrape the brownie batter into the prepared pan, and bake for 22-24 minutes, until a toothpick comes out with just a few moist crumbs attached. Cool completely. (Your cake may come out pretty flat-looking, but do not be concerned! Mine didn’t rise at all, but that was perfectly fine and turned out totally delicious.)
- Prepare either a 9-inch cake pan with a removable bottom, or a 9-inch springform pan. Line the inner wall of the pan with a 4-inch tall acetate cake collar or a 4-inch tall strip of aluminum foil or waxed paper. Make sure your lining is long enough so that it overlaps itself.
- Once the brownie cake has completely cooled, carefully place the baked brownie cake in the bottom of the prepared pan.
Chocolate mousse:
- To prepare the chocolate mousse layer, combine the chocolate, 3/4 cup of cream, and salt in a microwave-safe bowl. Microwave in 30-second increments, stirring very well every 30 seconds, until the chocolate has melted and the mixture is smooth. (If you overheat the mixture, the cream will break and the mixture will look lumpy and greasy – if this happens, don’t worry! Just proceed with the recipe – once you mix in the other ingredients it will come together and smooth out just fine.) Let it cool to room temperature, stirring occasionally.
- While you wait for the chocolate mixture to cool, prepare the gelatin. Whisk together the gelatin and the cold water in a small bowl, and set it aside to let the gelatin absorb the water. Make sure all the gelatin looks wet. When the chocolate has cooled to room temperature, microwave the bowl of gelatin for 15 seconds, until it is melted. Whisk the melted gelatin into the chocolate mixture.
- Whip the remaining 1 cup of heavy cream to firm peaks. Fold the whipped cream into the chocolate. Scrape the mousse on top of the brownie cake, and spread it into an even layer. Refrigerate for at least 25 minutes, until the mouse has started to set and is firm enough that a second layer can be added.
Raspberry mousse:
- For the raspberry mousse, make a quick puree by blending 1/2 cup fresh raspberries in a blender or food processor. Pour them through a fine mesh strainer to remove the seeds, and measure out 1/4 cup raspberry puree. (If you have extra puree, save it for another use.)
- Combine the white chocolate, raspberry puree, 1/2 cup of heavy cream, and salt in a microwave-safe bowl. Very carefully microwave in 15-second increments, stirring very well every 15 seconds, until the chocolate has melted and the mixture is smooth. Be very very careful not to overheat the mixture, as white chocolate can easily scorch or burn if microwaved for too long (ask me how I know). Let it cool to room temperature, stirring occasionally.
- While you wait for the white chocolate mixture to cool, prepare the gelatin. Whisk together the gelatin and the cold water in a small bowl, and set it aside to let the gelatin absorb the water. Make sure all the gelatin looks wet. When the chocolate has cooled to room temperature, microwave the bowl of gelatin for 15 seconds, until it is melted. Whisk the melted gelatin into the chocolate mixture.
- Whip the remaining 1 cup of heavy cream to firm peaks. Fold the whipped cream into the white chocolate mixture. Add a few drops of pink food coloring for a more vibrantly pink color, if desired. Once the whipped cream and food coloring is mixed in, stir in the remaining 1 cup of fresh raspberries.
- Pour the raspberry mousse on top of the chocolate mousse layer, and spread it into an even layer. Refrigerate for at least 25 minutes, until the mouse has started to set.
Honey-vanilla mousse:
- Finally, prepare the vanilla bean layer. Combine the white chocolate, 1/2 cup heavy cream, honey, and salt in a microwave-safe bowl. Very carefully microwave in 15-second increments, stirring very well every 15 seconds, until the chocolate has melted and the mixture is smooth. Be very very careful not to overheat the mixture, as white chocolate can easily scorch or burn if microwaved for too long. Let it cool to room temperature, stirring occasionally.
- While you wait for the white chocolate mixture to cool, prepare the gelatin. Whisk together the gelatin and the cold water in a small bowl, and set it aside to let the gelatin absorb the water. Make sure all the gelatin looks wet. When the chocolate has cooled to room temperature, microwave the bowl of gelatin for 15 seconds, until it is melted. Whisk the melted gelatin into the chocolate mixture.
- Whip the remaining 1 cup of heavy cream to firm peaks. Fold the whipped cream into the white chocolate mixture. Stir in the vanilla bean paste.
- Pour the honey-vanilla mousse on top of the raspberry mousse layer, and spread it into an even layer. Refrigerate to set the mousse layers very well, at least 4 hours or overnight.
Ganache/toppings:
- To finish the cake, push the bottom out from the pan, or unhinge the sides, and unwrap the acetate strip. Transfer the cake to your serving platter.
- Make a quick chocolate ganache by putting the chopped chocolate in a small bowl and heating the cream to a simmer. Pour the hot cream over the chopped chocolate and whisk gently until the chocolate melts and you have a smooth, shiny mixture.
- Pour the ganache over the top of the cake, and use a spatula to nudge it right to the edge and over in evenly spaced drizzles. Don’t worry if the top is not smooth — it will be covered up! Add the fresh raspberries and chocolate curls on top of the cake. Refrigerate to set the ganache.
- For the cleanest slices, cut the cake when it is well chilled. Use a large sharp knife, and wash it frequently between cuts. For the best taste and texture, allow the cake slices to sit at room temperature for 10-15 minutes before serving.
- Enjoy!
- The Chocolate Raspberry Mousse Cake can be stored well-wrapped in the refrigerator for up to a week.
It’s less than a week until the Super Bowl – what are you making this year?
Whether you’re watching for the football, the commercials, the half-time show, or the cute animals (puppy bowl, anyone?)… if you’re reading this, you probably agree that what you’re eating is equally as important (if not more so) as what you’re watching.
If you’re still looking for some menu inspiration, don’t despair! I’ve rounded up the top ten most popular Super Bowl recipes that our users have shared on Fridgg, and you’re sure to come away with some tasty ideas!
For example, who wouldn’t love one (or ten) of these amazing bacon cheese puffs from Eva in the Kitchen?
Chili is a game day classic, and this five-bean turkey chili that Justine from Cooking and Beer shared on Fridgg sounds like a perfect version!
I’m all about finger food for the Super Bowl, which makes these taco bites a great game day appetizer.
Also, pizza bites from The Life Jolie! Pizza + no-mess finger food = an excellent choice for parties.
I’ve always got to have some sort of dip at our Super Bowl party, and I know our party-goers would go crazy over Justine’s spicy chipotle fry sauce!
Another game day classic from Justine (with a blog named “Cooking and Beer”, you know she’s got tons of great game-day eats!) are these Italian-style slow cooker meatballs – easy and delicious!
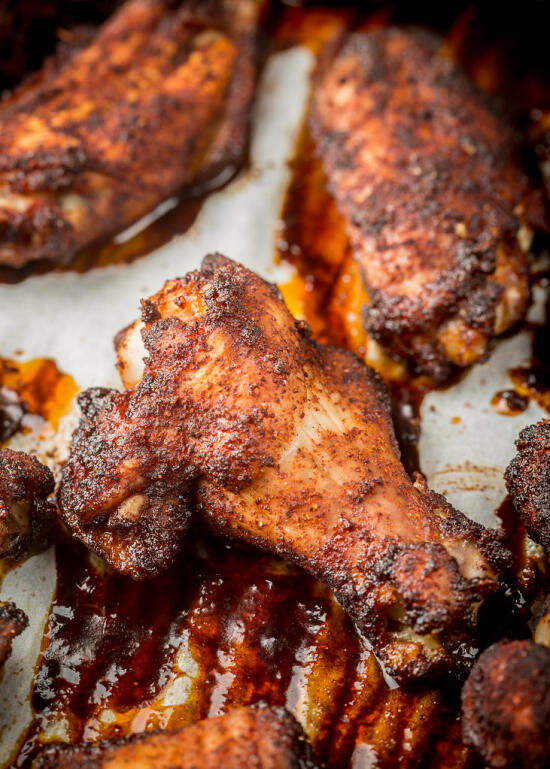
Didn’t think we’d forgotten about the wings, did you? Justine’s chipotle ranch chicken wings are a finger lickin’ good game day option!
Not to mention, these baked roast beef sliders, also from Justine, look oh so satisfying.
Our second most popular Super Bowl recipe on Fridgg is this amazing reuben dip – so packed with deliciousness, it could pass for a meal!
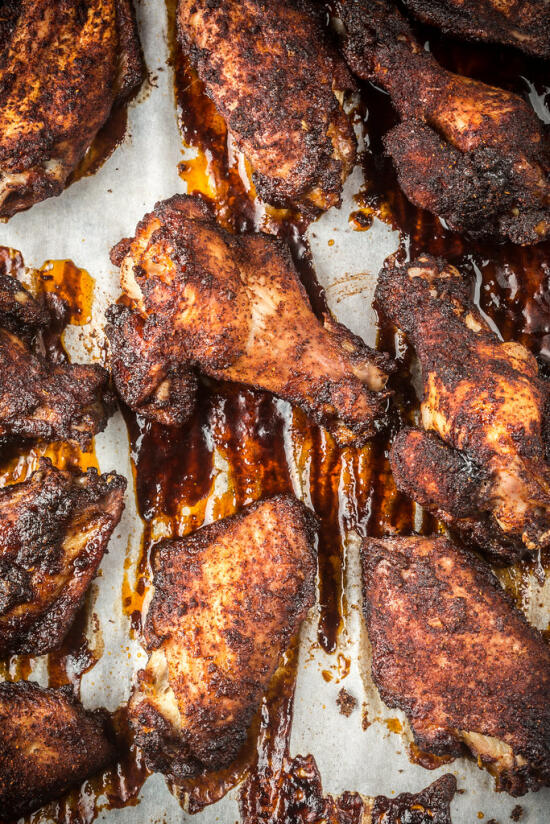
And our Super Bowl winner, the top most popular Super Bowl recipe on Fridgg are these insanely easy sweet chili wingettes, from Christina of A Soulful Twist!
Four ingredients. Easy directions. Obviously I had to try the wings out… you know, for quality purposes.
You know it’s a good recipe when we end up standing over the baking sheet, licking our fingers, and Son asks if I can please make these again for our Super Bowl party this year.
And it’s such a crazy easy recipe… how could I say no?
Sweet Chili Wingettes
Recipe from A Soulful Twist.
Ingredients
- 1 lb chicken wings
- 1 tbsp chili powder
- 1 tbsp brown sugar
- 1 tsp fine sea salt
Cooking Directions
- Preheat oven to 400°F. Pat the wings dry.
- Mix the seasonings together, then rub evenly all over the wings. Place wings in a single layer on a baking sheet.
- Bake for 30-35 minutes.
- Serve alongside a stack of napkins, and enjoy!
Who’s ready for the New Year?
The Lunar New Year, that is. This year, it falls on January 28th – the end of the year of the monkey, as we usher in the year of the rooster!
While my family doesn’t celebrate (we go crazy on January 1st), this is a big holiday for Son’s family. And as his parents get older, some of the cooking responsibilities are being passed on to me.
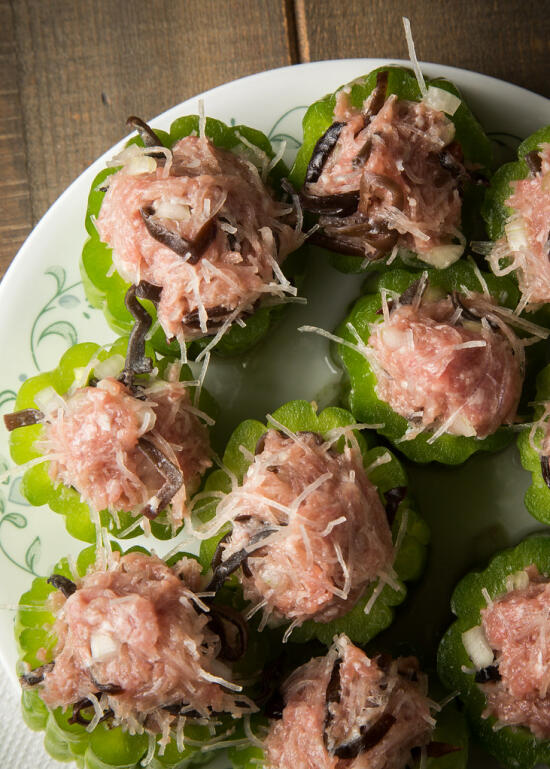
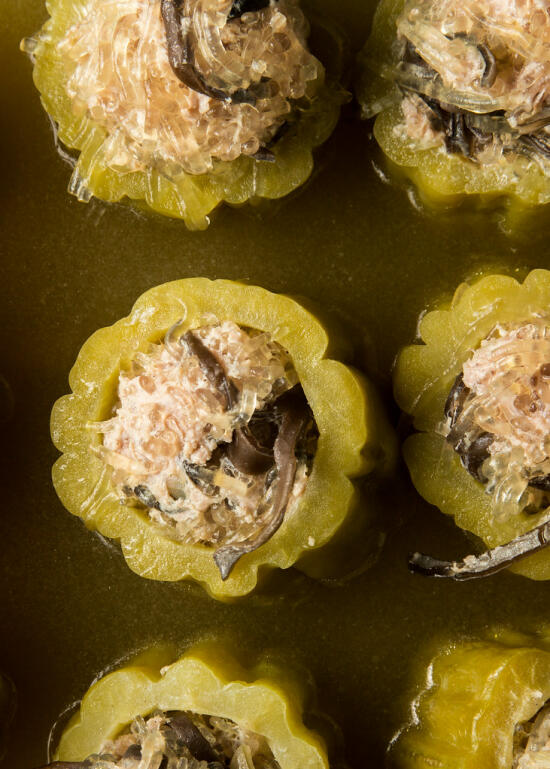
This bitter melon soup is a must for his celebration. It was a favorite of his grandmother, so we make it every year for her spirit to enjoy on the New Year.
I was a bit nervous the first time I made it, because bitter melon is… well… bitter.
(Who’d have ever guessed?)
However, the blanching mellows it significantly, and the pairing with pork always works wonderfully.
If you’re celebrating the Lunar New Year, this is a tasty addition to your table!
Recipe from The Ravenous Couple.
Ingredients
- 1/2 lb ground pork
- 1 tsp fish sauce
- 1 tsp sugar
- 1 tsp ground pepper (we prefer white pepper, but black pepper works just fine as well)
- 1/2 tsp salt
- 1 shallot, minced
- 1/4 cup dried wood ear mushrooms
- 1/2 cup bean thread noodles
- 2 8-12″ bitter melons
- 6 cups of chicken broth
- 1 green onion, thinly chopped
- cilantro, chopped
- salt
Cooking Directions
- In two separate small bowls, soak the dried wood ear mushrooms and the bean thread noodles in warm water for about 10 minutes. Drain, then slice the wood ear mushrooms thinly, and cut the bean thread noodles into 2-3″ lengths.
- In a large bowl, mix together the pork, fish sauce, sugar, pepper, salt, shallot, wood ear mushrooms, and bean thread noodles, and mix well. Set aside.
- Quickly blanch the bitter melons in boiling water for about 1 minute – the color should turn a dark green. Remove and let cool. When cool enough to handle, slice bitter melons cross-wise into 1-1.5″ slices. Using a spoon or knife, carve out the center white pith and seeds with a circular motion.
- Bring the chicken stock to a boil. Meanwhile, stuff the bitter melon slices with the pork stuffing. When the stock is boiling, gently drop in the stuffed bitter melons. Cover, reduce the heat to low, and cook for about 15 minutes or until the center of the pork is done. Season with salt to taste. Transfer to soup bowls and garnish with chopped green onions and cilantro. Serve with jasmine rice.