Archive for November, 2008

Happy Thanksgiving!
I love pumpkin pie. I love pecan pie. So why not both in one?
Even though she isn’t from the US, Vibi of La Casserole Carreé chose the Thanksgiving Twofer Pie for this week’s Tuesdays with Dorie recipe. Very thoughtful of her, because this is perfect for those of us in the US who needed a pie to bring to our Thanksgiving celebrations… like me! (I hope my family likes it as much as Son and I do!)
I know a lot of people had problems with this pie – although I had to bake the pie at 300° for twice as long as the recipe called for, there was no burning and the pie tastes wonderful. Very festive.
Oh, and there were also complaints about having too much filling. I doubled the recipe to make two pies, and with what was left over I made a mini pie in a custard cup… perfect!
Erm, and then there was that issue of rum. Yeah… I don’t drink alcohol. Son doesn’t drink alcohol. So spending that much for a huge bottle of rum that we’ll never use? Definitely not. However… over the summer, we were lucky enough to be invited to an awesome dinner party held by Diane and Todd of White on Rice Couple. There was a gift exchange, and we got a bottle of walnut liqueur from Brooke of Food Woolf. For a while we were scratching our heads, not quite sure what to do with it, but now we’ve finally found a solution! The subtle walnut liqueur works amazingly with the pumpkin pie filling and nutty pecan pie topping.

Here, have a slice of pie.
Plus, I have another reason to love this pie. Before this pie, I have never, ever had a pie turn out well. Either the pie ends up looking more like a turkey, or the filling never sets… it’s never a very pretty pie. Until now!
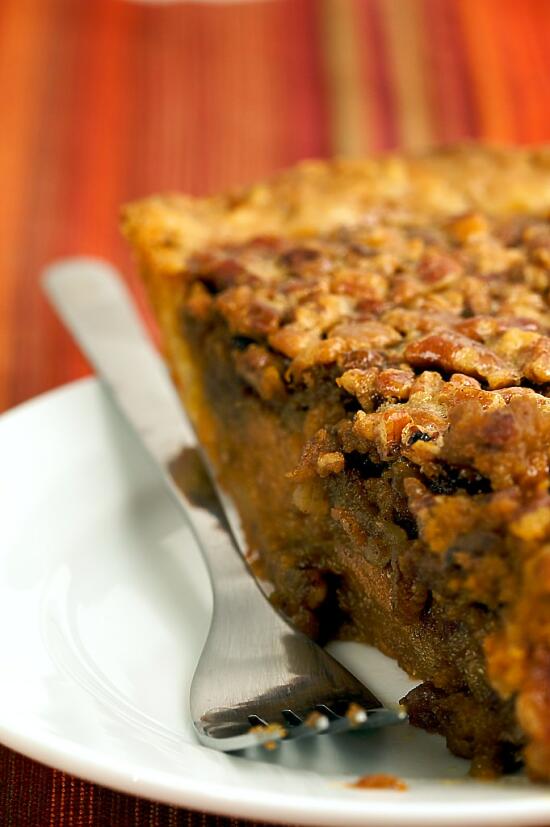
Pumpkin AND Pecan in one pie… yum!

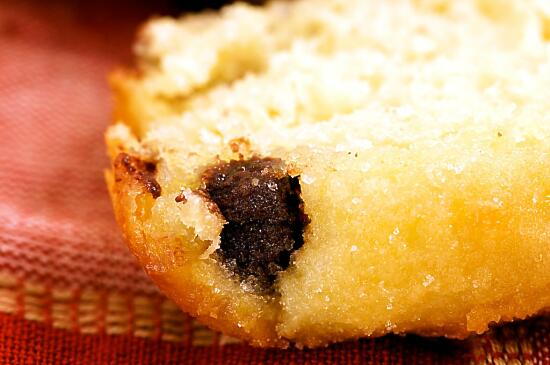
Chocolate Chip Cookies, with a big glass of milk
Over the summer, there was a big hullabaloo about chocolate chip cookies. EVERYONE was making these cookies. Though I’m certainly not the biggest chocolate chip cookie fan out there, I thought I’d try my hand at them as well.
Of course, there are always setbacks. I couldn’t find cake flour at my normal grocery store, and didn’t have the time to try Whole Foods. I forgot about these cookies for a while, and it wasn’t until Deb of Smitten Kitchen posted about them that I remembered how much I wanted to make them. Finally I found me some cake flour at Whole Foods, and got around to making them!
Yum. And now, something odd about me. All my life, my favorite way to eat chocolate chip cookies was without the chocolate chips. I used to always eat around them, then eat all the chocolate chips together at the end. Because of this, my mom would always make two or three plain cookies just for me. Of course, I had to make at least one plain cookie for myself, and… oh man. That was good. Caramelized sugar, crunchy around the outside, soft in the inside, and chewy in-between. Definitely preferred to the Nestle Toll House chocolate chip cookies I grew up on (though those are still enjoyable!) As always, the cookies are at their best enjoyed fresh out of the oven, with a tall glass of cold milk. Mmmmmm.
So are they worth all the extra work? Well, all the different flours… maybe not. The salt on top… well, I forget it nearly every time, so until I actually remember to put it on, I can’t really tell you if it’s worth it. But the 24-36 hour refrigeration, YES. However, this method isn’t new to me at all – even with the Nestle Toll House recipe, my mother ALWAYS stuck the cookie dough in the refrigerator at least overnight. My mother is a wise woman indeed!

Soft, melty chocolate chip cookies.
Ingredients
- 2 c minus 2 tbsp (8 1/2 oz) cake flour
- 1 2/3 c (8 1/2 oz) bread flour
- 1 1/4 tsp baking soda
- 1 1/2 tsp baking powder
- 1 1/2 tsp coarse salt
- 2 1/2 sticks (1 1/4 c) unsalted butter
- 1 1/4 c (10 oz) light brown sugar
- 1 c plus 2 tbsp (8 ounces) granulated sugar
- 2 large eggs
- 2 tsp vanilla extract
- 1 1/4 pounds bittersweet chocolate chips
- Sea salt
Cooking Directions
- Sift flours, baking soda, baking powder and salt into a bowl. Set aside.
- Using a mixer fitted with paddle attachment, cream butter and sugars together until very light, about 5 minutes.
- Add eggs, one at a time, mixing well after each addition.
- Stir in the vanilla.
- Reduce speed to low, add dry ingredients and mix until just combined, 5 to 10 seconds.
- Drop chocolate pieces in and try to incorporate them without breaking them.
- Press plastic wrap against dough and refrigerate for 24 to 36 hours. Dough may be used in batches, and can be refrigerated for up to 72 hours.
- When ready to bake, preheat oven to 350 degrees.
- Line a baking sheet with parchment paper or a nonstick baking mat.
- Form balls of dough a little smaller than golf balls, set on baking sheet about 2-3 inches apart.
- Sprinkle lightly with sea salt.
- Bake until golden brown but still soft, 18 to 20 minutes.
- Transfer sheet to a wire rack for 10 minutes, then slip cookies onto another rack to cool a bit more.
- Repeat with remaining dough.
- Enjoy with a big glass of milk!

Yum!

Vietnamese Curry
As I mentioned when I went to Hawaii, I’ve recently fallen in love with curry. All types of curry. To the point where I’ll randomly have major cravings for curry – any kind of curry.
Such was the case earlier this week. All of a sudden, on Tuesday, I wanted curry, but I didn’t have any S&B Golden Curry around – so no quick way to soothe my craving. However that wasn’t a problem – it was easy to make my own.
This recipe is for Vietnamese curry. Though similar, it has a very distinct taste – different from Japanese, Indian, or Thai curries. Depending on the curry you buy, the taste varies, and can range from mild to quite spicy, so make sure to check your curry package for ingredients and/or spice level before you buy!
Here is the recipe I used, adapted from RecipeZaar. My curry craving has been satisfied – for now.

Oh so flavorful…
Ingredients
- 2 tbsp olive oil
- 1 medium onion, diced
- 2 cloves garlic, minced
- 2 lbs boneless, skinless chicken, cut bite-size pieces
- 1 tsp salt, to taste
- 1 tsp pepper
- 2 tbsp good curry powder
- 3 large potatoes, skinned and cubed
- 2 large carrots, skinned and sliced
- 1 (13 1/2 ounce) can coconut milk
- 1 (13 1/2 ounce) can chicken stock
Cooking Directions
- Heat the oil in a large pot over medium heat and fry the onions and garlic for 1 minute.
- Add the chicken, cook for three minutes.
- Add the salt, pepper, and curry powder.
- Stir in spices, let cook for a few minutes, or until the chicken is tender.
- Add the remaining ingredients.
- Bring to a boil, then let simmer for 30-60 minutes, or until the vegetables are at your preferred softness. We like the veggies soft, so we cooked the curry for an hour, but if you prefer harder/crunchier vegetables in your curry, then cook it for less time.
- Serve over a bed of rice or with quality bread to dip in the curry.

…and incredibly addictive.

Kugelhopf
Kugelhopf, like rugelach, is another baked good that I had never in my life heard of before Yolanda from All-Purpose Girl picked it for TWD. However, I wasn’t too intimidated by this one – I’ve made brioche before (several people said this was similar) and I figure I can deal with any bread studded with chocolate chips.

Just look at those chocolate chips!
Wait, chocolate chips? Didn’t the recipe call for raisins? Well, yes, but I’m not a huge fan of raisins, and didn’t have any in my apartment, so chocolate chips it was.

I’m cutting a slice just for you…
Also, no traditional kugelhopf pan – I can’t justify buying a pan that I’ll probably never use again. But it turned out just as well in a regular loaf pan.

The airy bread would be perfect with a cup of coffee.
I even made a mini loaf of kugelhopf! Unfortunately, no pictures. We ate it as soon as it had cooled – sliced up the mini kugelhopf loaf and bananas, and scattered them atop some ice cream and drizzled it all with chocolate sauce. Seriously guys, it was an amazing way to eat the kugelhopf. The crispy, airy, somewhat dry kugelhopf paired incredibly well with the ice cream and bananas, and what isn’t improved by a little chocolate sauce?
Would you like some?
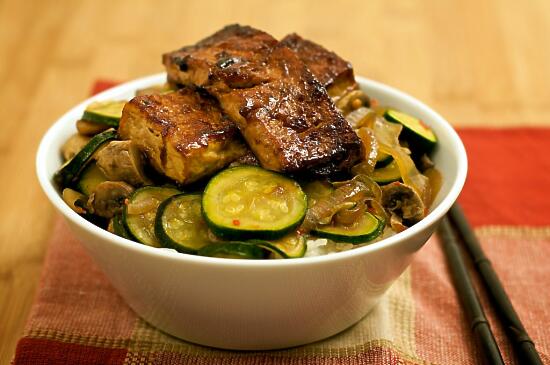
Tofu Stir-Fry
Ask anyone who knew me growing up, and they’ll tell you I’m a meat-and-potatoes girl. Who (*gasp*) refuses to eat her vegetables. Give me a big slab of steak and some sort of potato side dish, and I was happy. Of course, that was long ago, in my pickier years. I wouldn’t eat sashimi or most more exotic ethnic foods at that time either.
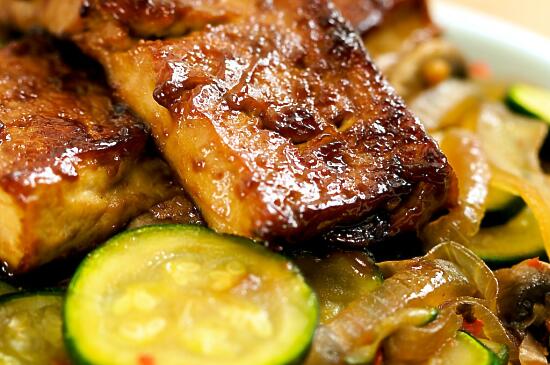
The rich tofu…
Nowadays, though I am by no means vegetarian, I’ve started to lean the other way. No longer does a big honkin’ piece of steak sound like the perfect meal – now I tend more towards fish (sashimi, anyone?) or even vegetarian dishes. Just a change in tastes, I suppose.
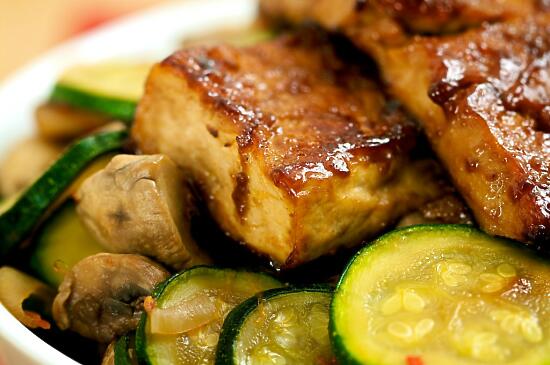
…the soft vegetables…
Recently we were at Son’s parents’ house for a Buddhist holiday where they couldn’t eat meat, and his mother made a vegetable stir-fry with this fried tofu. The old me would have turned up my nose at the dish but tried to choke it down to be polite, but nowadays? Well, needless to say, I loved it. So much, that I had to ask his mom for the recipe. She didn’t have actual measurements for anything, but I’ve tried my best to approximate the amounts that I used when I made the dish for dinner just a few hours ago… it was a success.
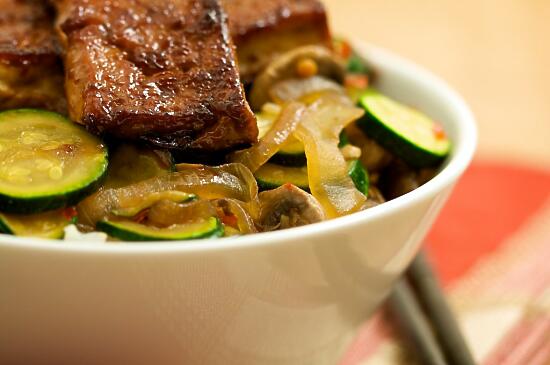
…all on a bed of rice.
Ingredients
- 1 container firm tofu
- 1 large onion, sliced
- 3 large zucchini, sliced
- about 20 mushrooms, quartered
- olive oil
- 1 cup shoyu
- 1/2 cup sugar
- 1/2 cup hoisin sauce
- 1 tbsp chili garlic sauce
Cooking Directions
- Slice the tofu along the short side into slices at least 1 cm thick.
- Pour a little bit of olive oil into a frying pan or wok, heat over medium heat.
- Place the half of the slices of tofu into the pan in one layer.
- Pour about 1/4 cup of shoyu over the tofu.
- Sprinkle about 2 tbsp sugar over the tofu.
- Spread about 1/2 tbsp hoisin sauce onto each piece of tofu.
- After about a minute, flip the tofu using a pair of tongs. (I find that it’s really difficult to flip the tofu using chopsticks without breaking the tofu slices.)
- Spread about 1/2 tbsp hoisin sauce onto the second side of each piece of tofu.
- After another minute, flip the tofu again. Continue flipping every minute or so, until the tofu begins to brown and the sauces/sugar begin to caramelize.
- Remove the tofu from the pan onto a plate.
- Repeat with the remaining tofu.
- When you have cooked and removed all the tofu, place the onion slices into the pan.
- Sauté the onions until translucent, then pour 1/2 cup shoyu and 1/4 cup sugar over the onions.
- Add the zucchini and mushrooms to the pan.
- Add in the chili garlic sauce. If you want your stir-fry spicier, then you can add more, but 1 tbsp is just enough to give it a kick without being very spicy.
- Sauté the vegetables until they are soft, about 5-10 minutes.
- Serve the vegetable stir-fry over a bed of rice or noodles, topped with a couple slices of fried tofu.

Does it get any better?


